Removing Silences from Videos with a Free Open-Source Tool (Local + Vercel Deployment)
Hi friends 👋 In this post, I want to show you the free, open-source tool I currently use to remove silences from my videos. We’ll walk through how it works locally, explore its UI and internals, and finally deploy it to Vercel so you can run it as a hosted solution.
If you create YouTube videos, podcasts, or tutorials, this tool can save you a lot of editing time.
Running the Project Locally
I’m starting directly from the repository. This is a Node.js project, and running it locally is straightforward:
yarn run dev
Once executed, the app runs on a local port and spins up a development server. The local UI is slightly different from the currently hosted version, which makes it ideal for experimentation and debugging.
Analyzing a Video (Silence Detection)
After the app is running, you can simply drag and drop a video file into the interface. I tested it with my previous video about Moises.ai, and the analysis was surprisingly fast.
To better understand what’s happening behind the scenes, I opened the developer tools. You can clearly see FFmpeg being loaded and network activity kicking in while the analysis runs.
Tweaking Detection Parameters
One of the best things about this tool is how configurable it is:
Mean volume – controls how quiet a segment must be to count as silence
Minimum silence duration – adjusts how long silence must last to be removed
After tweaking these values and clicking Analyze again, you’ll notice different results. Once finished, the app tells you the new duration of the video after silence removal.
Exporting the Result
When you’re happy with the analysis, you can:
Export the processed video
Export the timeline (useful for further editing)
At this point, everything is handled locally through FFmpeg, without uploading your video anywhere — a big plus for privacy.
Working with the Timeline UI
The UI is honestly one of the highlights of this project.
You get a visual timeline where silence regions are clearly marked. From here you can:
Add zones manually Click Zone Add and select the part you want to include or modify.
Remove zones manually Click Zone Delete and simply select the sound you want to remove.
You can immediately play back the result to verify that everything works as expected — and it does, really well.
Deploying to Vercel
Next, I wanted a hosted version, so I deployed the project to Vercel.
Steps:
Go to your Vercel dashboard
Click Import Project
Vercel detects it as a Node.js project automatically
Deploy with default settings
At first, I ran into a deployment error. After copying the error message into ChatGPT and applying a small fix, the deployment worked perfectly.
Once deployed, the app behaves exactly the same as the local version — but now it’s available online under my own Vercel URL.
Quick Look at the Codebase
Since we had some extra time, I explored the code to understand how silence removal actually works.
Tech Stack Overview
Node.js
UI built with a React-like framework
FFmpeg running in the browser
WaveSurfer.js for waveform visualization
Key Components
VideoEditor component
Timeline / waveform component
Silence detection logic in the video renderer
How Silence Detection Works
The core logic happens in a helper responsible for silence analysis:
It uses WaveSurfer.js with the Regions plugin
Regions are automatically extracted based on silence
The analyzeRegions helper:
Extracts regions
Filters them by silence thresholds
Produces the final list of segments to keep
FFmpeg is then called with the correct parameters to stitch together only the non-silent parts.
Simple, elegant, and very effective.
Final Thoughts
This tool is a great example of how powerful open-source projects can be when combined with modern web tech. It’s fast, private, configurable, and easy to deploy.
If you edit videos regularly, I highly recommend checking it out and even self-hosting it like I did.
This is a summary/transcription of this related video I made:
The Books I Read in 2025 (and Why I Recommend Them)
2025 is coming to an end, and for the first time on this channel, I wanted to talk about books. Reading has been an important part of my year, and I’ve gone through a mix of science fiction, music autobiographies, self-reflection, comedy, and technology. Here’s a rundown of the books I read in 2025 and why I think each of them is worth your time.
Exhalation – Ted Chiang
I’ll start with Exhalation by Ted Chiang. This is technically a science-fiction book, but honestly, it feels more like a philosophy book disguised as sci-fi. Each story explores deep ideas about consciousness, time, free will, and what it means to be human. If you enjoy science fiction that makes you stop and think rather than just entertain you, this one is highly recommended.
Eric Clapton: The Autobiography
Next is Eric Clapton: The Autobiography. I really liked this book because it’s not just about music—although if you love guitar and blues, that part is obviously great. It also dives deeply into addiction, personal struggles, and inner demons. If you’ve dealt with these issues yourself, or think you might someday, this book can be surprisingly helpful. It’s honestly incredible that Clapton is still alive and still rocking after everything he’s been through.
Stolen Focus – Johann Hari
Another book I read was Stolen Focus by Johann Hari. This is a self-help book, but in a very grounded way. If you often feel distracted, struggle to focus for long periods, or find yourself trapped in doom-scrolling on TikTok or similar platforms, this book is for you. It explores how modern technology affects our attention and why this is becoming a serious problem—not just for kids, but for everyone. I personally found it very insightful.
The Music Lesson – Victor Wooten
The Music Lesson by Victor Wooten is another standout. Victor Wooten is a legendary bassist, but this book isn’t really about music technique. It’s about life. Rhythm, listening, timing, and feel are all used as metaphors for how we live. Even if you’re not deeply into music, there’s a lot here that connects directly to everyday life.
Masters of Doom – David Kushner
This one is closer to the typical topic of my channel. Masters of Doom by David Kushner tells the story of John Carmack and John Romero, the creators of id Software. It’s a fascinating mix of hacking culture, creativity, obsession, and extremely hard work. The “work hard, party hard” mentality is very present. If you’re a developer or work in tech, this book is incredibly inspiring and motivating.
Into the Void – Geezer Butler
Into the Void is the autobiography of Geezer Butler from Black Sabbath. He talks extensively about his life, the band, and the people around them—Ozzy Osbourne and many others. I can only recommend this book if you’re really a fan of Black Sabbath or that style of music, which I am. Otherwise, it might not be for everyone.
Project Hail Mary – Andy Weir
Project Hail Mary by Andy Weir was one of the highlights of the year. It’s an excellent science-fiction novel with humor, emotional moments, and great pacing. I read it really, really fast. I’ve also heard there’s a movie adaptation coming, which doesn’t surprise me at all. If you like sci-fi that’s smart but also fun and emotional, this is an easy recommendation.
A Comedy Novel – Tom Sharpe
I also read a book by Tom Sharpe. It wasn’t my first time—I think I’ve read it two or three times already—and I still love it. His style of English comedy is absurd, sharp, and full of unexpected twists. I actually read this one during my wedding, which is quite ironic. If you enjoy British humor, Tom Sharpe is always a safe bet.
AI Engineering – Chip Huyen
The last book is AI Engineering by Chip Huyen. This is a fairly large book, but it’s not overly deep in every section. Instead, it works very well as an introduction for developers who want to understand how real AI systems are built. It’s practical, grounded, and avoids hype. The book focuses on how AI systems actually work, the trade-offs involved, and real-world constraints. Some chapters go deeper, while others stay high-level. Overall, it reflects what “AI engineering” has become—basically the new full-stack buzzword, but with real substance behind it.
Final Thoughts
This year I read quite a lot, especially about artificial intelligence and practical topics, but also about life, focus, creativity, and music. I’m genuinely happy about that, and I hope I’ll read just as much (or more) next year.
Reading is a great way to use your time. Instead of jumping from one small attention hole to another, reading forces you to focus. And as I learned—ironically—from Stolen Focus, the more time you spend truly focused on something, the happier you tend to be.
If you read any of these books this year, or plan to, let me know. And if you have recommendations for 2026, I’m always open to them.
When working with containers, especially in Kubernetes, it’s common to troubleshoot network issues or communicate with other services from within a POD. For most engineers, the go-to tools for these tasks are often BusyBox utilities like telnet, curl, nc or wget. However, there are scenarios where BusyBox isn’t installed in the POD, and you find yourself without these essential networking tools.
Related video:
But don’t worry—if your POD has bash installed, there’s a lesser-known method you can use: /dev/tcp. This built-in feature of bash allows you to perform basic network communication tasks directly from the command line.
The Role of BusyBox in a POD
BusyBox is a popular suite of Unix utilities that provides stripped-down versions of common commands. It’s widely used in containers because of its minimal footprint. With BusyBox, you get access to a variety of tools, including:
telnet for simple network connections,
wget and curl for making HTTP requests,
nslookup or dig for DNS lookups.
However, if your POD image is extremely minimal or designed for a specific purpose, BusyBox might not be included. This leaves you without the usual arsenal of network troubleshooting tools.
Enter /dev/tcp: A Hidden Bash Gem
If you’re stuck without BusyBox, and you have access to bash, you can still perform network operations using the special file /dev/tcp. This feature is available in bash versions 2.04 and later, and it provides a way to make TCP and UDP connections directly from the shell.
How /dev/tcp Works
The /dev/tcp file isn’t a real file on disk—rather, it’s a special bash feature that lets you open a network connection and send or receive data. The syntax is straightforward:
cat < /dev/tcp/<hostname>/<port>
This command attempts to read from a TCP connection to the specified hostname and port. You can also send data by redirecting output to /dev/tcp:
Here, the exec 3<>/dev/tcp/example.com/80 command opens a TCP connection to example.com on port 80 and assigns file descriptor 3 to it. The echo command sends an HTTP GET request to the server, and the cat command reads and displays the response.
3. Basic DNS Query
You can use /dev/udp (a similar feature for UDP) to perform a simple DNS query:
This sends a raw DNS query to Google’s DNS server (8.8.8.8) asking for the IP address of example.com. Interpreting the response requires more work, but this example shows how you can interact with network services at a low level.
Conclusion
While BusyBox is a fantastic toolset for handling networking tasks inside a POD, it isn’t always available. In such cases, knowing how to use /dev/tcp can be a lifesaver. This built-in feature of bash allows you to perform basic network operations, such as checking open ports or making simple HTTP requests, without relying on external utilities.
Remember, though, that /dev/tcp is not as user-friendly or powerful as tools like curl or wget. It’s best used as a fallback option when you’re in a minimal environment and need to troubleshoot connectivity issues.
By mastering these lesser-known tools, you can be better prepared for any situation that arises within your Kubernetes environment.
In the fast-paced world of modern computing, where sleek interfaces and seamless connectivity reign supreme, it’s easy to forget about the old tools that paved the way for today’s digital marvels. One such tool is Telnet. Though it may seem antiquated now, Telnet has a storied history and even today, offers some unexpectedly fun uses that you can enjoy right from your keyboard.
See related video in my Youtube channel.
What is Telnet?
Telnet, short for “TELetype NETwork,” is one of the earliest protocols used for accessing remote computers over the internet or a local network. Telnet allows users to connect to remote servers and interact with them as if they were local, using a text-based interface. Before graphical user interfaces (GUIs) became the norm, Telnet was a fundamental tool for system administrators, developers, and anyone needing remote access to a computer.
Telnet operates on the client-server model. A Telnet client connects to a Telnet server via the command line or a terminal emulator, and once connected, users can execute commands on the remote machine. It was a revolutionary tool in its time, but it lacks the security features of more modern protocols like SSH (Secure Shell). As a result, Telnet has largely fallen out of favour for secure communications but remains a fascinating relic of the early internet.
Two Fun Uses of Telnet
Despite its outdated nature, Telnet can still provide a surprising amount of entertainment. Here are two fun and nostalgic uses of Telnet that you can try out:
1. Watch Star Wars in ASCII Art
One of the most delightful Easter eggs hidden on the internet is the ability to watch “Star Wars: Episode IV – A New Hope” rendered entirely in ASCII art via Telnet. This project, created by Simon Jansen, captures the magic of the iconic film using nothing but characters from the ASCII table.
How to Watch:
Open your terminal or command prompt.
Type the following command and press Enter: telnet towel.blinkenlights.nl
You will be greeted with a surprisingly detailed rendition of the Star Wars universe, complete with scrolling text and iconic scenes—all crafted with ASCII characters. It’s a testament to the creativity of early internet enthusiasts and a fun way to revisit a classic film.
2. Relive the Max Headroom Phenomenon
Max Headroom, the iconic 1980s character known for his glitchy, computer-generated appearance and stuttering speech, became a symbol of futuristic tech and cyberpunk aesthetics. While Max Headroom’s origins lie in TV, movies, and commercials, you can experience a bit of this retro-futuristic character through Telnet.
How to Connect:
Open your terminal or command prompt.
Type the following command and press Enter: telnet 1984.ws
You’ll be greeted with a Max Headroom emulation that pays homage to the quirky and groundbreaking character. It’s a fun way to dive into the retro-futuristic world that captivated audiences in the 80s.
How to Exit Telnet
While exploring Telnet is fun, knowing how to exit the session is equally important. Exiting Telnet sessions can vary slightly depending on the client and the server configuration, but here are the general steps:
Use the escape sequence:
Typically, you can use the escape sequence Ctrl+] (hold Ctrl and press ]). This should bring you to the Telnet command prompt (telnet>).
Close the connection:
Once at the Telnet command prompt, type quit or exit and press Enter. This should close the Telnet session and return you to your original command prompt.
Alternative method:
If the above methods don’t work, simply closing the terminal or command prompt window will also terminate the Telnet session.
If your console is weird after telnet, run “reset”
Conclusion
Telnet may no longer be the go-to tool for remote computing, but its legacy lives on in unexpected ways. Whether you’re an old-school tech enthusiast or just looking for a bit of nostalgic fun, exploring Telnet can be a rewarding experience. From watching Star Wars in ASCII art to reliving the Max Headroom phenomenon, these hidden gems highlight the enduring creativity and innovation of early internet culture. So, fire up your terminal, connect to a Telnet server, and take a step back in time—you might just be surprised by what you find. And when you’re ready to log off, just remember those simple steps to exit. Happy exploring!
In the digital age, where information security is paramount, steganography has emerged as a fascinating and subtle method for concealing information. Unlike traditional encryption, which transforms data into a seemingly random string, steganography hides information in plain sight. One intriguing technique is the use of hidden Unicode characters in plain text, an approach that combines simplicity with stealth.
Related video from my Youtube channel:
What is Steganography?
Steganography, derived from the Greek words “steganos” (hidden) and “graphein” (to write), is the practice of concealing messages or information within other non-suspicious messages or media. The goal is not to make the hidden information undecipherable but to ensure that it goes unnoticed. Historically, this could mean writing a message in invisible ink between the lines of an innocent letter. In the digital realm, it can involve embedding data in images, audio files, or text.
The Role of Unicode in Text Steganography
Unicode is a universal character encoding standard that allows for text representation from various writing systems. It includes many characters, including letters, numbers, symbols, and control characters. Some of these characters are non-printing or invisible, making them perfect for hiding information within plain text without altering its visible appearance.
How Does Unicode Steganography Work?
Unicode steganography leverages the non-printing characters within the Unicode standard to embed hidden messages in plain text. These characters can be inserted into the text without affecting its readability or format. Here’s a simple breakdown of the process:
Choose Hidden Characters: Unicode offers several invisible characters, such as the zero-width space (U+200B), zero-width non-joiner (U+200C), and zero-width joiner (U+200D). These characters do not render visibly in the text.
Encode the Message: Convert the hidden message into a binary or encoded format. Each bit or group of bits can be represented by a unique combination of invisible characters.
Embed the Message: Insert the invisible characters into the plain text at predetermined positions or intervals, embedding the hidden message within the regular text.
Extract the Message: A recipient who knows the encoding scheme can extract the invisible characters from the text and decode the hidden message.
Example: Hiding a Message
Let’s say we want to hide the message “Hi” within the text “Hello World”. First, we convert “Hi” into binary (using ASCII values):
H = 72 = 01001000
i = 105 = 01101001
Next, we map these binary values to invisible characters. For simplicity, let’s use the zero-width space (U+200B) for ‘0’ and zero-width non-joiner (U+200C) for ‘1’. The binary for “Hi” becomes a sequence of these characters:
We then embed this sequence in the text “Hello World”:
H\u200B\u200C\u200B\u200B\u200C\u200B\u200B\u200B e\u200B\u200C\u200C\u200B\u200C\u200B\u200B\u200C llo World
To the naked eye, “Hello World” appears unchanged, but the hidden message “Hi” is embedded within.
Advantages and Disadvantages
Advantages:
Subtlety: The hidden information is invisible to the casual observer.
Preserves Original Format: The visible text remains unaltered, maintaining readability and meaning.
Easy to Implement: Inserting and extracting hidden characters is straightforward with proper tools.
Disadvantages:
Limited Capacity: The amount of data that can be hidden is relatively small.
Vulnerability: If the presence of hidden characters is suspected, they can be detected and removed.
Dependence on Format: Changes in text formatting or encoding can corrupt the hidden message.
Practical Applications
Secure Communication: Concealing sensitive messages within seemingly innocuous text.
Watermarking: Embedding copyright information in digital documents.
Data Integrity: Adding hidden markers to verify the authenticity of text.
Conclusion
Unicode steganography in plain text with hidden characters offers a clever and discreet way to conceal information. By understanding and utilizing the invisible aspects of Unicode, individuals can enhance their data security practices, ensuring their messages remain hidden in plain sight. As with all security techniques, it’s essential to stay informed about potential vulnerabilities and to use these methods responsibly.
In the realm of cybersecurity, staying ahead of potential threats is paramount. One innovative method that has gained traction in recent years is the use of canary tokens. These digital tripwires are designed to alert organizations to potential breaches and unauthorized access. In this blog post, we’ll explore what canary tokens are, how they work, and why they are becoming an essential tool in the cybersecurity toolkit.
Related video from my channel:
What are Canary Tokens?
Canary tokens, inspired by the canaries historically used in coal mines to detect dangerous gases, are digital markers that serve as early warning systems for unauthorized access or malicious activity. When a canary token is accessed, triggered, or interacted with in any unauthorized manner, it sends an alert to the network administrators, signaling a potential security breach.
These tokens can take various forms, including:
Documents: Files with embedded tracking capabilities.
Web URLs: Links that trigger alerts when visited.
API Keys: Fake credentials that generate warnings when used.
DNS Entries: Domain name entries that alert administrators when queried.
How Do Canary Tokens Work?
The operation of canary tokens is straightforward yet effective. Here’s a typical workflow:
Deployment: Canary tokens are strategically placed within a network, embedded in documents, or distributed in ways that they appear attractive to potential attackers.
Monitoring: The tokens remain dormant until they are accessed or triggered. They are designed to look like genuine assets or credentials, making them appealing targets.
Alerting: When a token is accessed, it sends an alert to the administrators. This alert can be in the form of an email, SMS, or integration with a monitoring system.
Response: Upon receiving an alert, administrators can investigate the breach, determine the extent of the intrusion, and take necessary actions to mitigate the threat.
Why Use Canary Tokens?
Canary tokens offer several advantages that make them a valuable addition to any cybersecurity strategy:
1. Early Detection
Canary tokens provide early warnings of potential security breaches, allowing organizations to respond quickly before significant damage occurs. This proactive approach can prevent data theft, system compromise, and other malicious activities.
2. Simplicity and Low Cost
Implementing canary tokens is relatively simple and cost-effective compared to other cybersecurity measures. They do not require complex infrastructure changes or significant financial investments.
3. Minimal False Positives
Since canary tokens are designed to be accessed only in specific scenarios, the likelihood of false positives is low. Alerts generated by canary tokens are more likely to indicate genuine security incidents.
4. Versatility
Canary tokens can be customized to fit various scenarios and environments. Whether embedded in documents, disguised as login credentials, or hidden in web applications, they can be tailored to meet specific security needs.
5. Psychological Deterrence
The knowledge that canary tokens are in place can act as a psychological deterrent for potential attackers. The risk of triggering an alert and being detected can discourage malicious activities.
Real-World Applications of Canary Tokens
Protecting Sensitive Data
Organizations dealing with sensitive information, such as financial institutions or healthcare providers, can embed canary tokens in critical files. If these files are accessed or exfiltrated, administrators are immediately alerted.
Monitoring Network Intrusions
Canary tokens can be placed within a network to detect unauthorized access. For example, creating a fake administrative login page with a canary token can reveal attempts to gain unauthorized control.
API Security
By deploying canary tokens as fake API keys, organizations can detect and track the misuse of stolen credentials. This helps in identifying compromised systems and taking corrective actions.
Conclusion
In an era where cyber threats are constantly evolving, canary tokens offer a proactive and efficient way to detect and respond to security incidents. Their simplicity, cost-effectiveness, and versatility make them an invaluable tool for organizations looking to bolster their cybersecurity defenses. By incorporating canary tokens into their security strategies, organizations can gain a critical edge in protecting their digital assets and maintaining the integrity of their networks.
Stay vigilant, stay secure, and consider deploying canary tokens as part of your comprehensive cybersecurity strategy.
Portable Network Graphics (PNG) is a popular raster graphics file format known for its lossless compression and wide support across various platforms and applications. In this blog post, we’ll delve into how PNG works, its format structure with a focus on headers and chunks, and how Draw.io leverages these features to embed drawing code within PNG files.
Related video from my Youtube channel:
The PNG Format
PNG was developed to replace the older Graphics Interchange Format (GIF). It offers several advantages, including better compression and support for a wider range of colors and transparency levels. Unlike JPEG, which is a lossy format, PNG preserves the original image quality, making it ideal for images that require precise details, such as text, graphics, and illustrations.
Structure of a PNG File
A PNG file is composed of a series of chunks. Each chunk has a specific function and structure, allowing for flexible and efficient image data storage. Here’s a breakdown of the core components of a PNG file:
PNG Signature: The file starts with an 8-byte signature that identifies the file as a PNG image. This signature is essential for programs to recognize and process the file correctly.
Chunks: Following the signature, the file consists of multiple chunks. Each chunk has four main parts:
Length (4 bytes): The length of the data field.
Chunk Type (4 bytes): A four-letter ASCII code specifies the chunk type.
Chunk Data (variable length): The data contained in the chunk.
CRC (4 bytes): A cyclic redundancy check value for error-checking.
There are several critical chunks, including:
IHDR (Image Header): Contains basic information about the image, such as width, height, bit depth, color type, compression method, filter method, and interlace method.
PLTE (Palette): Defines the color palette used if the image is paletted.
IDAT (Image Data): Contains the actual image data, compressed using the zlib algorithm.
IEND (Image End): Marks the end of the PNG file.
Additional chunks can store metadata, text information, and other data, enabling extended functionalities.
How Draw.io Embeds Code in PNG Files
Draw.io is an online diagramming tool that allows users to create a wide range of diagrams, from flowcharts to network diagrams. One of its unique features is the ability to embed the diagram’s XML code directly within a PNG file. This makes it easy to share and store diagrams without needing separate files for the image and the underlying code.
Here’s how Draw.io achieves this:
Embedding XML in a PNG: Draw.io takes advantage of PNG’s chunk-based structure by adding a custom chunk that contains the diagram’s XML data. This chunk is typically labeled zTXt or tEXt to indicate compressed or uncompressed textual data, respectively.
Custom Chunk Integration: When a user saves a diagram as a PNG in Draw.io, the application generates the diagram’s XML representation and compresses it if necessary. This XML data is then inserted into a custom chunk within the PNG file.
Reading Embedded Data: When the PNG file is opened in Draw.io, the application scans the chunks, identifies the custom chunk containing the XML data, extracts it, and reconstructs the diagram based on the embedded code.
This seamless integration allows users to benefit from the portability and compatibility of the PNG format while maintaining the ability to edit and update the diagrams within Draw.io.
Conclusion
PNG is a versatile and powerful image format, and its chunk-based structure offers extensive flexibility for embedding additional data. Draw.io leverages this feature to embed the diagram’s XML code directly within PNG files, making it convenient for users to share and edit diagrams without losing any information. Understanding the inner workings of PNG and its structure not only enhances our appreciation for this format but also opens up possibilities for creative and innovative uses in various applications.
In the ever-evolving landscape of web development and content management, WordPress stands as a steadfast titan, empowering millions of websites with its user-friendly interface and robust features. However, deploying WordPress can sometimes be a challenging task, especially for those new to server management and configuration. Fortunately, with the advent of containerization and orchestration technologies like Kubernetes, deploying WordPress has become more streamlined and efficient than ever before. One such method is leveraging the Bitnami Helm Chart, offering a seamless solution for deploying WordPress on Kubernetes clusters. In this blog post, we’ll explore the process of deploying WordPress using the Bitnami Helm Chart, highlighting its simplicity and effectiveness.
What is Bitnami?
Before delving into the deployment process, let’s take a moment to understand Bitnami. Bitnami is a well-known name in the world of application packaging and deployment automation. They offer a vast library of pre-configured software packages, including popular applications like WordPress, Drupal, Joomla, and many others. These packages are designed to be easily deployable across various platforms, making it convenient for developers and administrators to set up complex applications with minimal effort.
Their WordPress chart is the most active and downloaded amount the ones listed in artifacthub.io
Introducing Helm and Kubernetes
Helm is a package manager for Kubernetes that simplifies the process of deploying, managing, and upgrading applications. It uses charts, which are packages of pre-configured Kubernetes resources, to define the structure of an application. Kubernetes, on the other hand, is an open-source container orchestration platform that automates the deployment, scaling, and management of containerized applications.
Deploying WordPress with Bitnami Helm Chart
Now, let’s walk through the steps of deploying WordPress using the Bitnami Helm Chart:
Setup Kubernetes Cluster: Before deploying WordPress, you’ll need to have a Kubernetes cluster up and running. This can be a local cluster using tools like Minikube or a cloud-based solution like Google Kubernetes Engine (GKE), Amazon Elastic Kubernetes Service (EKS), or Microsoft Azure Kubernetes Service (AKS).
Install Helm: Install Helm on your local machine or wherever you’ll be running the Helm commands. Helm provides a command-line interface (CLI) for managing charts and releases.
Add Bitnami Repository:
Add the Bitnami Helm repository to Helm by running the following command:
Customize Values (Optional): Optionally, you can customize the values in the values.yaml file to configure aspects of the WordPress deployment, such as resource limits, database credentials, and ingress settings. Make sure you have read their great README to understand the different options you have.
Deploy WordPress:
Finally, deploy WordPress using the Bitnami WordPress Helm Chart with the following command: helm install my-wordpress bitnami/wordpress
Access WordPress: Once the deployment is complete, you can access your WordPress site by retrieving the external IP address or domain associated with the WordPress service. Simply navigate to that address in your web browser, and you should see the WordPress installation wizard, allowing you to set up your site.
Hint: if you enabled ingress, you can always describe the ingress resource to see how to reach it. Otherwise you need to describe the SVC.
Benefits of Using Bitnami Helm Chart for WordPress
Deploying WordPress with the Bitnami Helm Chart offers several advantages:
Simplified Deployment: The Helm Chart abstracts away the complexity of deploying WordPress on Kubernetes, making it accessible to developers of all skill levels.
Consistency: Bitnami’s extensive experience in packaging applications ensures that the WordPress deployment is reliable and consistent across different environments.
Customization: While the default configuration works out of the box, you have the flexibility to customize various aspects of the deployment to suit your specific requirements.
Scalability: Kubernetes enables seamless scaling of WordPress instances to handle varying levels of traffic and workload.
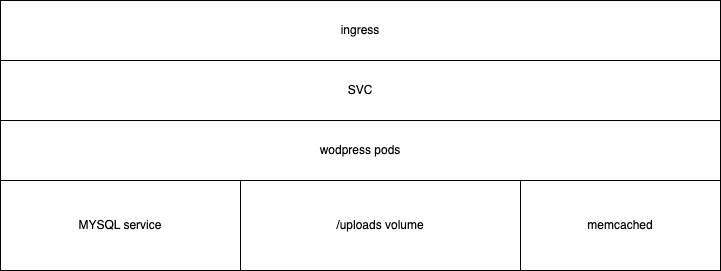
A common use case example
Let’s say you want to deploy WordPress with high availability being able to scale horizontally. Checking the README you will want to increase the replicaCount from default 1 to N.
This figure summarizes the components we would have:
Ingress: you might need a more complex ingress configuration if you want to enforce security with network.
WordPress pods: instead of having a single replica, you will want N, being able to grow automatically.
Mysql service: here lives most of your WordpPress state, except uploads.
Memcached: make your frontend fast! Avoid touching the DB over and over again for the same posts.
However, once you can have N pods you need common storage for certain things. If you are lucky with the requirements you’d better not offering installing plugins from the interface and you should burn them in a custom image or in a customPostInitScript. That way you can have this config which only uses the shared volume for uploads and config:
  extraEnvVars:
  - name: WORDPRESS_DATA_TO_PERSIST
    # Note: we avoid persisting plugins/themes for performance reasons
    value: "wp-config.php wp-content/uploads"
If you need to offer plugin installation through the admin interface it will mean you will need to use a really fast volume for that. E.g Azure Files is really bad for that because of all those tiny PHP files, even using the premium offering. I thought OP Cache would limit the impact but it was not enough, leave a comment if you know certain tweak related to this as I was unable to make it well enough and the admin interface was horrible to use. At least the user facing part can be easily cached thought.
Lastly, you really want to enable Memcached. You need to use a deployed Memcached pod or you can use an external service. You will need to use the W3 Total cache plugin so that you can take advantage of it.
  memcached:
    enabled: true
Common pitfalls and solutions
Troubleshooting hints
You might be reproducing performance issues, the best thing you can do is deploying root run pods in DEV so that you can add a few var_dumps or even installing xdebug which will find the culprit for sure:
Note: Be aware that this is horrible for production envs. I recommend only enabling it in local/DEV k8s!!
  # Configuration to run wordpress as root.
  # Only enable for troubleshooting, e.g profiling with xdebug
  #podSecurityContext:
  #  enabled: true
  #  fsGroup: 0
  #containerSecurityContext:
  #  runAsNonRoot: false
  #  runAsGroup: 0
  #  runAsUser: 0
  #  readOnlyRootFilesystem: false
  #  privileged: true
  #  allowPrivilegeEscalation: true
You might also need to disable health checks so that you can debug stuff there:
Note: same note, only for local/DEV envs.
  # Health checks override, only set as false for troubleshooting
  #livenessProbe:
  #  enabled: false
  #readinessProbe:
  #  enabled: false
  #startupProbe:
  #  enabled: false
Populating the volume and editing wp-config.php
You probably need to fill the /uploads folder or tweak the wp-config.php file. Just use kubectl cp.
About wp-config.php persistence
The config file is generated according to the Values.yaml when helm install is run but not with upgrade, that is an expected behaviour. However, at least you can override the database config, which is a common thing you might need to change:
  # We are persisting wp-config.php but we need to update the DB when needed
  overrideDatabaseSettings: yes
Additionally, if you need to update the wp-config.php file you can use kubectl cp. An alternative would be using a secret for the config instead (check existingWordPressConfigurationSecret in the README).
Running customPostInitScripts every time the pods are created.
You can try this workaround, thank me in the comments or provide a better solution if you know it please:
    my-script.sh: |
      #!/bin/bash
      set -x
      # Plugins repository is https://wordpress.org/plugins
      #export WP_CLI_PACKAGES_DIR=/bitnami/wordpress/wpcli-packages
      # Workaround for https://github.com/bitnami/charts/issues/21216
      (sleep 10 && rm -f /bitnami/wordpress/.user_scripts_initialized)&
      echo "Finished my-script.sh"
Customizing more stuff
If the bitnami chart values.yaml is not enough for you use case you can always create your own chart which uses the bitnami one as a child. E.g that way you can have your own ingress.yaml file:
You can also fork the chart easily just copying locally and using a local reference instead of OCI. That is also a solution if you want to make sure you don’t depend on docker.io for chart retrieval.
The Bitnami Helm Chart provides a hassle-free solution for deploying WordPress on Kubernetes, allowing developers to focus on building and managing their websites without getting bogged down by infrastructure concerns. By leveraging the power of Helm and Kubernetes, deploying WordPress has never been easier or more efficient. Whether you’re a seasoned Kubernetes pro or just getting started, the Bitnami Helm Chart for WordPress is a valuable tool in your arsenal for modern web development. However, there are different use cases that require different configurations, and you’ll need to work on that.
About this blog post
“A common use case example” and “Common pitfalls and solutions” have been 100% written by humans, whereas the rest of the blog post has been generated with LLM and tweaked a bit with extra details.
In an era where information is constantly flowing through various forms of media, the need to extract and transcribe audio content has become increasingly important. Whether you’re a journalist, a content creator, or simply someone looking to convert spoken words into written text, the process of transcribing audio can be a game-changer. In this guide, we’ll explore how to transcribe audio from an MP4 file to text using Whisper AI, a powerful automatic speech recognition (ASR) system developed by OpenAI.
Related video from my Youtube channel:
What is Whisper AI?
Whisper AI is an advanced ASR system designed to convert spoken language into written text. It has been trained on an extensive dataset, making it capable of handling various languages and accents. Whisper AI has numerous applications, including transcription services, voice assistants, and more. In this guide, we will focus on using it for transcribing audio from MP4 files to text.
Prerequisites
Before you can start transcribing MP4 files with Whisper AI, make sure you have the following prerequisites in place:
Docker: Docker is a platform for developing, shipping, and running applications in containers. You’ll need Docker installed on your system. If you don’t have it, you can download and install Docker.
MP4 to MP3 Conversion: Whisper AI currently accepts MP3 audio files as input. If your audio is in MP4 format, you’ll need to convert it to MP3 first. There are various tools available for this purpose. You can use FFmpeg for a reliable and versatile conversion process.
Finally, use the following command to transcribe the MP3 file to text using Whisper AI. In this example, we’re specifying the model as “small” and the language as “Spanish.” Adjust these parameters according to your needs:
docker container run --rm --volume ${VOLUME_DIRECTORY}:/data whisper --model small --language Spanish /data/$FILE_NAME
Once you execute this command, Whisper AI will process the audio file and provide you with the transcribed text output.
You’ll see transcription is outputted through stdout so consider piping the docker run to a file.
docker container run --rm --volume ${VOLUME_DIRECTORY}:/data whisper --model small --language Spanish /data/$FILE_NAME &> result.txt
You can monitor how it goes with:
tail -f result.txt
If you see a warning like:
/usr/local/lib/python3.9/site-packages/whisper/transcribe.py:114: UserWarning: FP16 is not supported on CPU; using FP32 instead
It will mean that you lack a CUDA setup so it will run using your CPU.
Also notice that here we’re using the small model, which is good enough but perhaps too slow with CPU usage. In my machine, it takes like 2.5 hours to transcribe 3 hours of audio.
Conclusion
Transcribing audio from MP4 to text has never been easier, thanks to Whisper AI and the power of Docker. With this guide, you can efficiently convert spoken content into written text, opening up a world of possibilities for content creation, research, and more. Experiment with different Whisper AI models and languages to tailor your transcription experience to your specific needs. Happy transcribing!
Note: I’ve written this blog post with the help of ChatGPT based on my own experiments with Whisper AI. I’m just too lazy to write something coherent in English. Sorry for that, I hope you liked it anyway.
Prompt: “Write a blog post whose title is HOWTO transcribe from mp4 to txt with Whisper AI. It should explain what Whisper AI is but also explain how to extract mp3 from mp4, and the following commands, ignore first column: 10054 git clone https://github.com/hisano/openai-whisper-on-docker.git 10055 cd openai-whisper-on-docker 10056 docker image build –tag whisper:latest . 10057 VOLUME_DIRECTORY=$(pwd) 10058 FILE_NAME=hello.mp3 10059 cp ../20230503_094932-Meeting\ Recording.mp3 ./hello.mp3 10060 docker container run –rm –volume ${VOLUME_DIRECTORY}:/data whisper –model small –language Spanish /data/hello.mp3” . After that, I added some extra useful information about performance.
Linux Cinnamon is a popular desktop environment used by many Linux users. While it is generally stable and reliable, like any software, it can sometimes fail or crash. When this happens, it can be frustrating for users who rely on Cinnamon to get their work done. In this blog post, we will explain why Cinnamon might fail and how to restart it when it does.
Why does Cinnamon fail?
There are several reasons why Cinnamon might fail or crash. Some common causes include:
System updates: Sometimes, updates to the Linux system or other software can cause compatibility issues that result in Cinnamon failing.
Hardware issues: If there is a problem with your computer’s hardware, such as a failing hard drive or faulty RAM, it can cause Cinnamon to crash.
User error: Occasionally, a user may accidentally make changes to their system or Cinnamon configuration that cause it to fail.
Bugs in Cinnamon: While Cinnamon is generally a stable and reliable desktop environment, it is not immune to bugs or other issues that can cause it to fail.
How to restart Cinnamon
If Cinnamon fails, the first step to take is to try restarting it. Here are the steps to follow:
Press Ctrl + Alt + F2 on your keyboard. This will take you to a command line interface.
Enter your username and password to log in.
Type the following command to stop the Cinnamon process: pkill -HUP cinnamon
Wait a few seconds, then type the following command to start Cinnamon again: cinnamon --replace &
Press Ctrl + Alt + F7 on your keyboard to return to the Cinnamon desktop environment.
If Cinnamon does not restart using these steps, you may need to try restarting your computer or troubleshooting other potential issues.
In conclusion, while Linux Cinnamon is generally a stable and reliable desktop environment, it can fail or crash for various reasons. When this happens, it can be frustrating, but restarting Cinnamon can often resolve the issue. If you are unable to restart Cinnamon using the steps outlined in this post, you may need to seek additional support or troubleshooting resources.
Bonus track!
There is indeed a more straightforward way to restart Cinnamon. Here are the steps to follow:
Press Alt + F2 on your keyboard. This will open the “Run Command” dialog.
Type the letter “r” into the text field and press Enter. This will restart the Cinnamon process.
Wait a few seconds for Cinnamon to restart. If everything has gone smoothly, you should be able to continue using Cinnamon as normal.
Using Alt + F2 and typing “r” to restart Cinnamon is a quick and easy way to get your desktop environment back up and running if it has failed or crashed. This method does not require logging in to the command line interface or typing any commands, making it more accessible for users who may not be familiar with the command line.