In the ever-evolving landscape of web development and content management, WordPress stands as a steadfast titan, empowering millions of websites with its user-friendly interface and robust features. However, deploying WordPress can sometimes be a challenging task, especially for those new to server management and configuration. Fortunately, with the advent of containerization and orchestration technologies like Kubernetes, deploying WordPress has become more streamlined and efficient than ever before. One such method is leveraging the Bitnami Helm Chart, offering a seamless solution for deploying WordPress on Kubernetes clusters. In this blog post, we’ll explore the process of deploying WordPress using the Bitnami Helm Chart, highlighting its simplicity and effectiveness.
What is Bitnami?
Before delving into the deployment process, let’s take a moment to understand Bitnami. Bitnami is a well-known name in the world of application packaging and deployment automation. They offer a vast library of pre-configured software packages, including popular applications like WordPress, Drupal, Joomla, and many others. These packages are designed to be easily deployable across various platforms, making it convenient for developers and administrators to set up complex applications with minimal effort.
Their WordPress chart is the most active and downloaded amount the ones listed in artifacthub.io
Introducing Helm and Kubernetes
Helm is a package manager for Kubernetes that simplifies the process of deploying, managing, and upgrading applications. It uses charts, which are packages of pre-configured Kubernetes resources, to define the structure of an application. Kubernetes, on the other hand, is an open-source container orchestration platform that automates the deployment, scaling, and management of containerized applications.
Deploying WordPress with Bitnami Helm Chart
Now, let’s walk through the steps of deploying WordPress using the Bitnami Helm Chart:
- Setup Kubernetes Cluster: Before deploying WordPress, you’ll need to have a Kubernetes cluster up and running. This can be a local cluster using tools like Minikube or a cloud-based solution like Google Kubernetes Engine (GKE), Amazon Elastic Kubernetes Service (EKS), or Microsoft Azure Kubernetes Service (AKS).
- Install Helm: Install Helm on your local machine or wherever you’ll be running the Helm commands. Helm provides a command-line interface (CLI) for managing charts and releases.
- Add Bitnami Repository:
- Add the Bitnami Helm repository to Helm by running the following command:
helm repo add bitnami https://charts.bitnami.com/bitnami
- Customize Values (Optional): Optionally, you can customize the values in the
values.yamlfile to configure aspects of the WordPress deployment, such as resource limits, database credentials, and ingress settings. Make sure you have read their great README to understand the different options you have. - Deploy WordPress:
- Finally, deploy WordPress using the Bitnami WordPress Helm Chart with the following command:
helm install my-wordpress bitnami/wordpress
- Finally, deploy WordPress using the Bitnami WordPress Helm Chart with the following command:
- Access WordPress: Once the deployment is complete, you can access your WordPress site by retrieving the external IP address or domain associated with the WordPress service. Simply navigate to that address in your web browser, and you should see the WordPress installation wizard, allowing you to set up your site.
- Hint: if you enabled ingress, you can always describe the ingress resource to see how to reach it. Otherwise you need to describe the SVC.
Benefits of Using Bitnami Helm Chart for WordPress
Deploying WordPress with the Bitnami Helm Chart offers several advantages:
- Simplified Deployment: The Helm Chart abstracts away the complexity of deploying WordPress on Kubernetes, making it accessible to developers of all skill levels.
- Consistency: Bitnami’s extensive experience in packaging applications ensures that the WordPress deployment is reliable and consistent across different environments.
- Customization: While the default configuration works out of the box, you have the flexibility to customize various aspects of the deployment to suit your specific requirements.
- Scalability: Kubernetes enables seamless scaling of WordPress instances to handle varying levels of traffic and workload.
A common use case example
Let’s say you want to deploy WordPress with high availability being able to scale horizontally. Checking the README you will want to increase the replicaCount from default 1 to N.
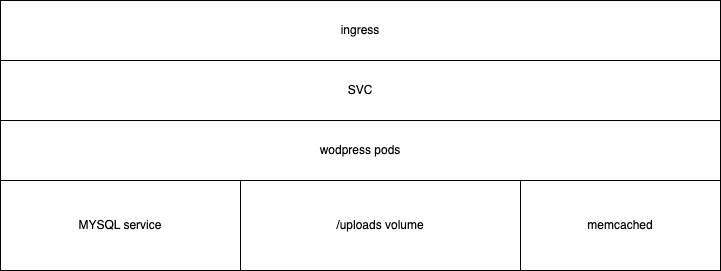
This figure summarizes the components we would have:
- Ingress: you might need a more complex ingress configuration if you want to enforce security with network.
- WordPress pods: instead of having a single replica, you will want N, being able to grow automatically.
- Mysql service: here lives most of your WordpPress state, except uploads.
- Memcached: make your frontend fast! Avoid touching the DB over and over again for the same posts.
Related config example:
autoscaling:
    enabled: true
    minReplicas: 3
    maxReplicas: 9
    targetCPU: 50
    targetMemory: 50
However, once you can have N pods you need common storage for certain things. If you are lucky with the requirements you’d better not offering installing plugins from the interface and you should burn them in a custom image or in a customPostInitScript. That way you can have this config which only uses the shared volume for uploads and config:
  extraEnvVars:
  - name: WORDPRESS_DATA_TO_PERSIST
    # Note: we avoid persisting plugins/themes for performance reasons
    value: "wp-config.php wp-content/uploads"
If you need to offer plugin installation through the admin interface it will mean you will need to use a really fast volume for that. E.g Azure Files is really bad for that because of all those tiny PHP files, even using the premium offering. I thought OP Cache would limit the impact but it was not enough, leave a comment if you know certain tweak related to this as I was unable to make it well enough and the admin interface was horrible to use. At least the user facing part can be easily cached thought.
Lastly, you really want to enable Memcached. You need to use a deployed Memcached pod or you can use an external service. You will need to use the W3 Total cache plugin so that you can take advantage of it.
  memcached:
    enabled: true
Common pitfalls and solutions
Troubleshooting hints
You might be reproducing performance issues, the best thing you can do is deploying root run pods in DEV so that you can add a few var_dumps or even installing xdebug which will find the culprit for sure:
Note: Be aware that this is horrible for production envs. I recommend only enabling it in local/DEV k8s!!
  # Configuration to run wordpress as root.
  # Only enable for troubleshooting, e.g profiling with xdebug
  #podSecurityContext:
  #  enabled: true
  #  fsGroup: 0
  #containerSecurityContext:
  #  runAsNonRoot: false
  #  runAsGroup: 0
  #  runAsUser: 0
  #  readOnlyRootFilesystem: false
  #  privileged: true
  #  allowPrivilegeEscalation: true
You might also need to disable health checks so that you can debug stuff there:
Note: same note, only for local/DEV envs.
  # Health checks override, only set as false for troubleshooting
  #livenessProbe:
  #  enabled: false
  #readinessProbe:
  #  enabled: false
  #startupProbe:
  #  enabled: false
Populating the volume and editing wp-config.php
You probably need to fill the /uploads folder or tweak the wp-config.php file. Just use kubectl cp.
About wp-config.php persistence
The config file is generated according to the Values.yaml when helm install is run but not with upgrade, that is an expected behaviour. However, at least you can override the database config, which is a common thing you might need to change:
  # We are persisting wp-config.php but we need to update the DB when needed
  overrideDatabaseSettings: yes
Additionally, if you need to update the wp-config.php file you can use kubectl cp. An alternative would be using a secret for the config instead (check existingWordPressConfigurationSecret in the README).
existingWordPressConfigurationSecret: "wp-config-secret"Running customPostInitScripts every time the pods are created.
You can try this workaround, thank me in the comments or provide a better solution if you know it please:
    my-script.sh: |
      #!/bin/bash
      set -x
      # Plugins repository is https://wordpress.org/plugins
      #export WP_CLI_PACKAGES_DIR=/bitnami/wordpress/wpcli-packages
      # Workaround for https://github.com/bitnami/charts/issues/21216
      (sleep 10 && rm -f /bitnami/wordpress/.user_scripts_initialized)&
      echo "Finished my-script.sh"
Customizing more stuff
If the bitnami chart values.yaml is not enough for you use case you can always create your own chart which uses the bitnami one as a child. E.g that way you can have your own ingress.yaml file:
apiVersion: v2
name: my-wordpress-chart
description: My WordPress chart
type: application
version: 1.0.0
appVersion: 1.0.0

dependencies:
  - name: wordpress
    version: X.Y.Z
    repository: oci://registry-1.docker.io/bitnamicharts
You can also fork the chart easily just copying locally and using a local reference instead of OCI. That is also a solution if you want to make sure you don’t depend on docker.io for chart retrieval.
Further than that you can build and use your own WordPress docker image and repository.
Note: never customize a docker image in order to burn default config containing secrets!
Unable to connect to Azure Mysql
If you cannot connect to Azure Mysql even though host and credentia are fine. Just try this and you’re welcome:
wordpressExtraConfigContent: "define('MYSQL_CLIENT_FLAGS', MYSQLI_CLIENT_SSL);"Conclusion
The Bitnami Helm Chart provides a hassle-free solution for deploying WordPress on Kubernetes, allowing developers to focus on building and managing their websites without getting bogged down by infrastructure concerns. By leveraging the power of Helm and Kubernetes, deploying WordPress has never been easier or more efficient. Whether you’re a seasoned Kubernetes pro or just getting started, the Bitnami Helm Chart for WordPress is a valuable tool in your arsenal for modern web development. However, there are different use cases that require different configurations, and you’ll need to work on that.
About this blog post
“A common use case example” and “Common pitfalls and solutions” have been 100% written by humans, whereas the rest of the blog post has been generated with LLM and tweaked a bit with extra details.
